




Time Attendance
How to use Leave
Leave is where members apply for leave and where admins approve or reject requests. It also shows how many leave days each member has taken and has left.
- Where
- Time > Attendance > Leave
- Who
- Everyone applies for leave. Admins and roles with the Leave Management or Members module approve requests and see all balances.
- Plan
- All plans
Every member has a leave balance in days. A member asks for leave with a date range and a reason. When an admin or leave manager approves the request, its days come off the balance. In this guide, a leave manager is a member whose Access control role includes the Leave Management or Members module.
Set up leave balances
Step 1: Set Global leave
In the sidebar, under Workspace, click Settings, then Activity & privacy. In Global leave (1), enter the leave days a year for everyone. It saves when you press Enter or click outside the box.
Step 2: Set one member's leave days if needed
On the same page, under Individual members, type a number in a member's Leave days box (2). That gives them their own allowance. Leave it blank (Use global) to use Global leave.
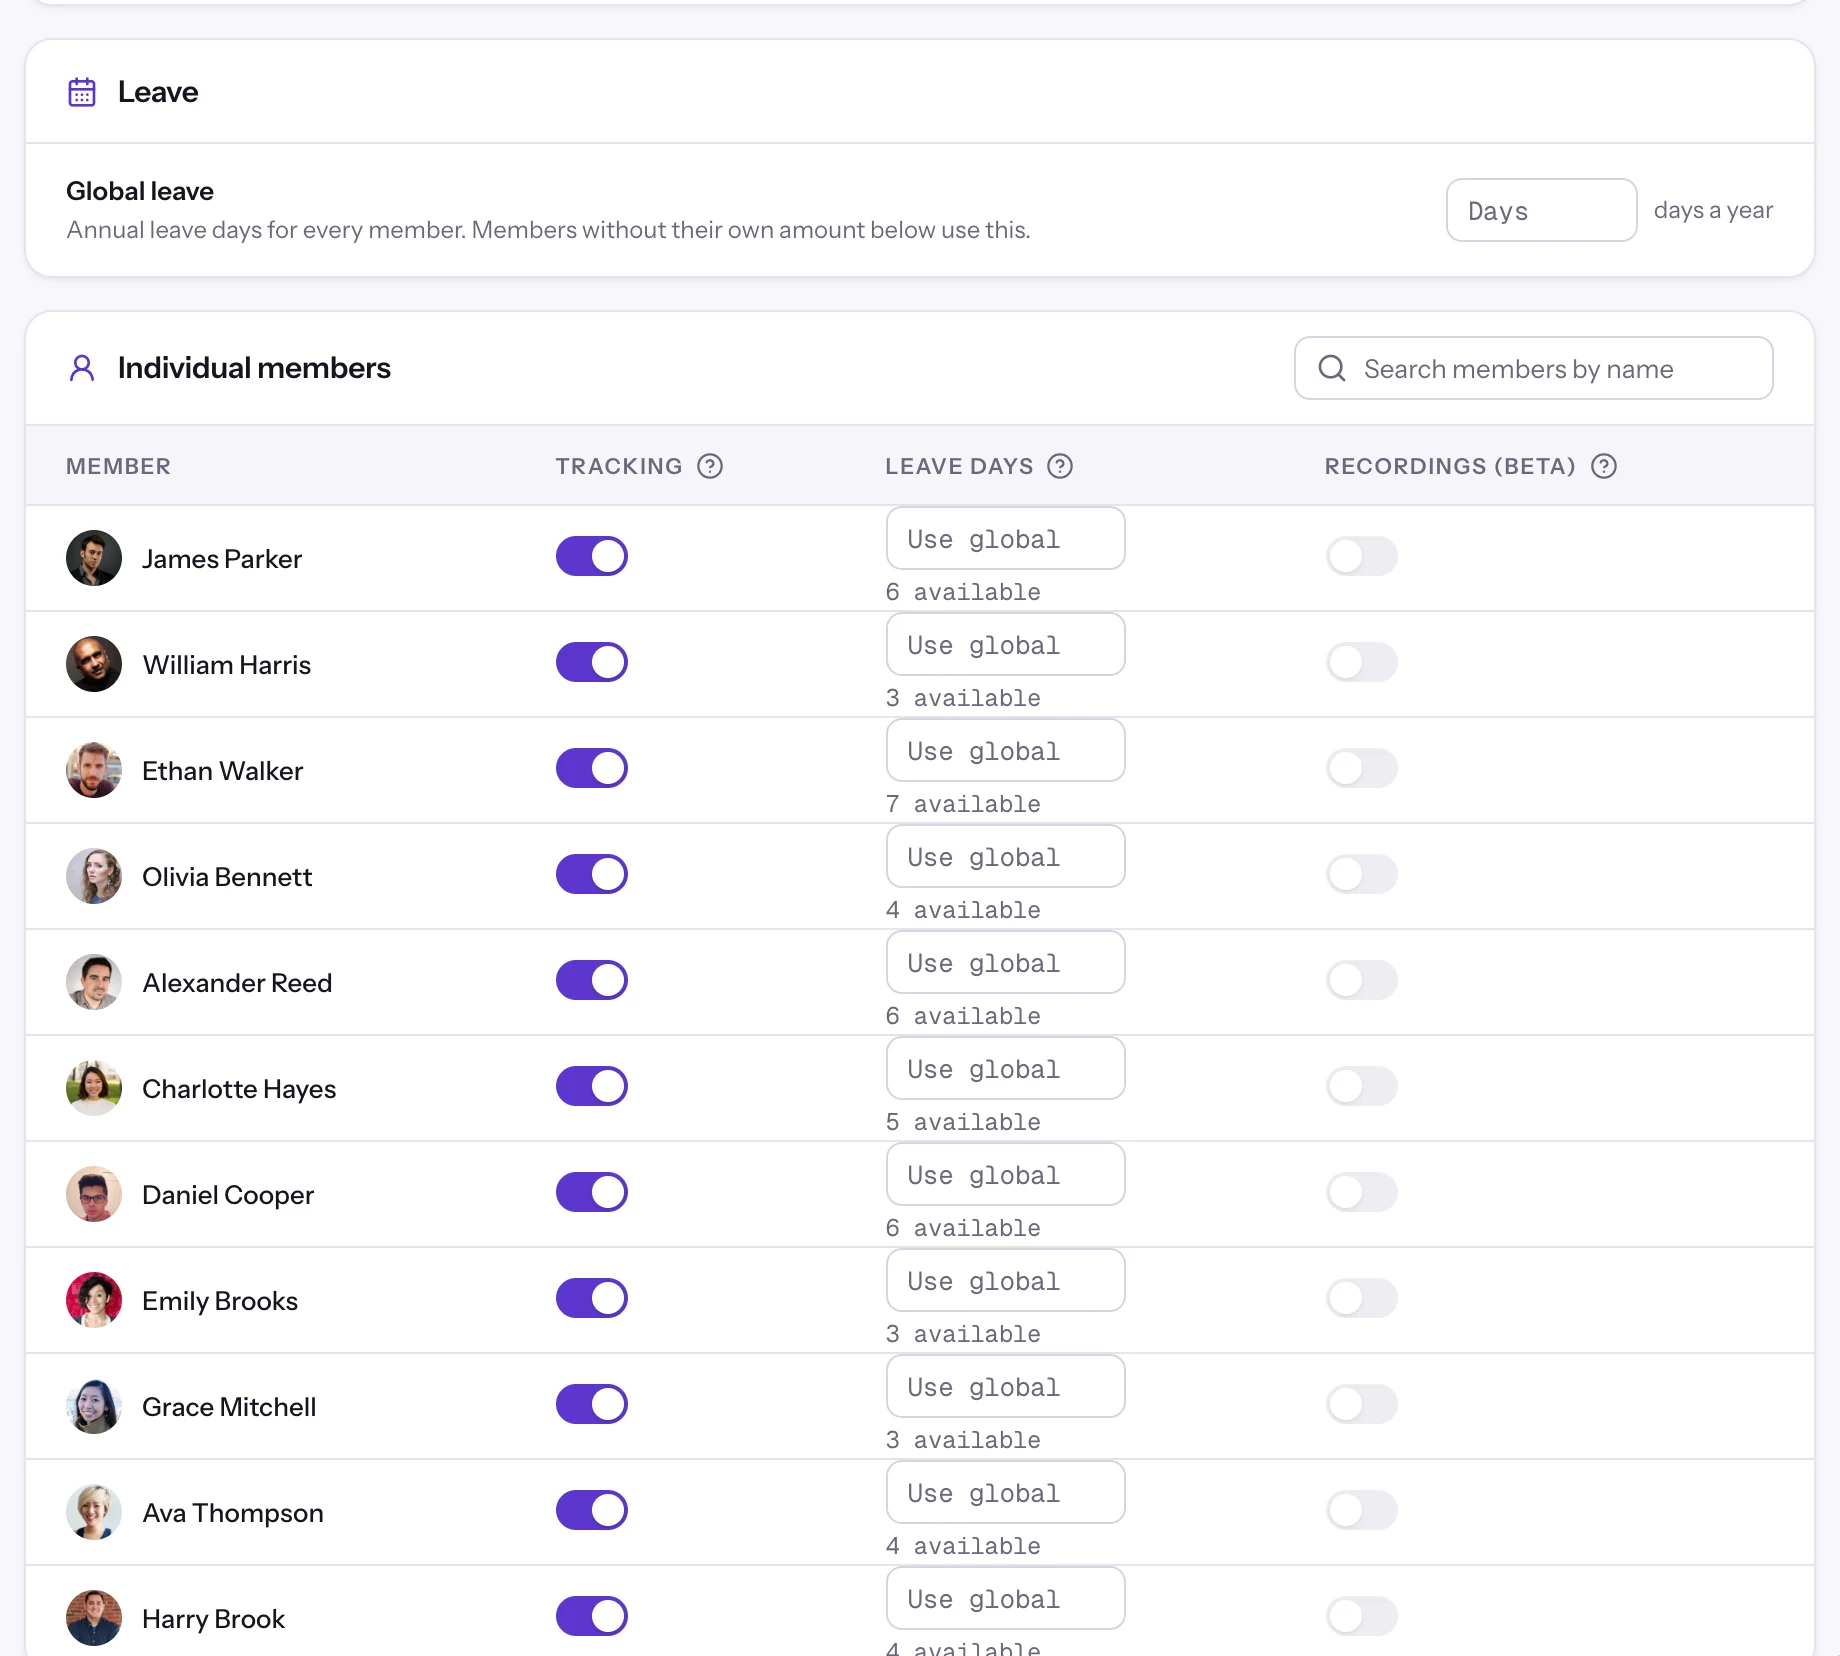
- 1Global leave
- 2Leave days, per member
Staffic sets a member's starting balance once, the first time their leave data loads, for example when an admin opens the Balances tab. Changing Global leave or a member's leave days later doesn't change a balance that already exists. Use Edit leaves on the member's profile for that.
The three tabs

- 1Balances, Requests and My requests
- 2Days taken per month
- 3Taken and Available
- Balances
- Leave days taken in each month (2), Jan to Dec, then Taken and the Available balance (3). A dash means zero. Admins and leave managers see everyone, 20 per page. Other members see only their own row.
- Requests
- Every request from the team, newest first, with buttons to approve, reject and delete. Only admins and roles with the Leave Management or Members module see this tab.
- My requests
- Your own requests, with Dates, Days, Submitted, Reason and Status, and the Apply for leave button. Everyone sees this tab.
The tabs sit at the top (1). Admins and leave managers start on Balances. Other members start on My requests.
Apply for leave
Step 1: Open My requests
In the sidebar, under Time, click Attendance, then Leave. Click the My requests tab (1).
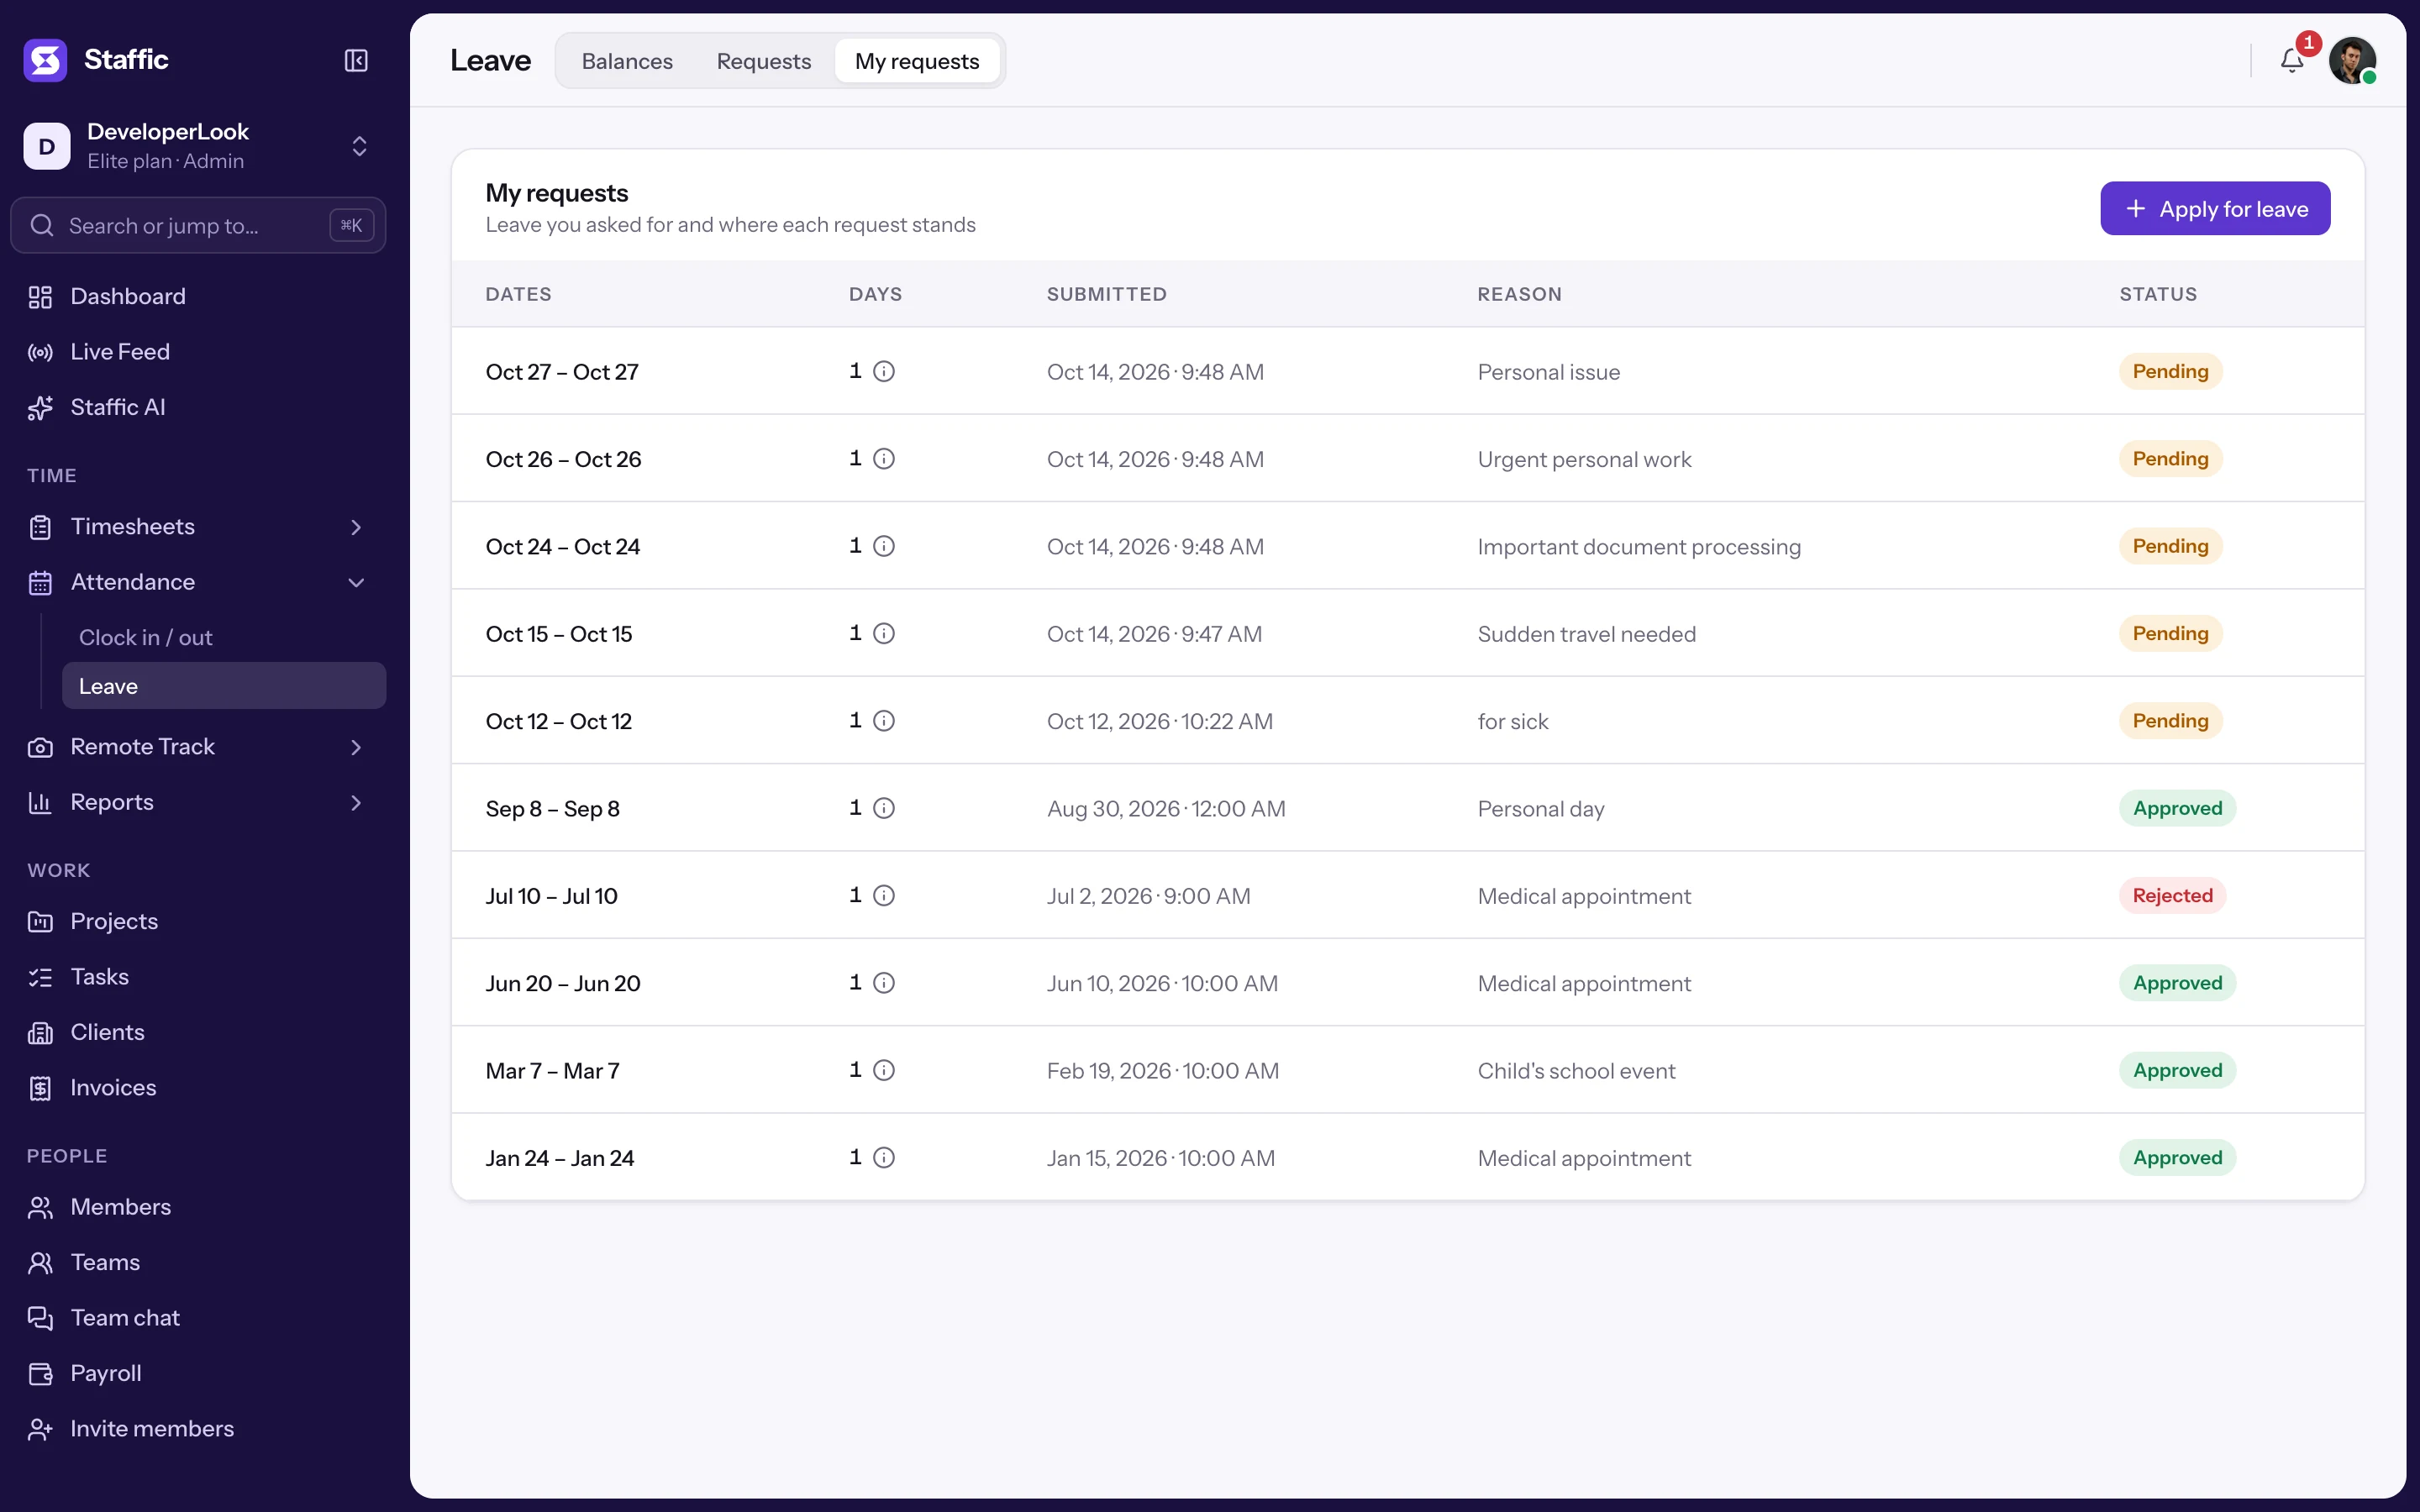
- 1My requests
- 2Apply for leave
- 3Dates, Days, Submitted, Reason and Status
Step 2: Click Apply for leave
Click Apply for leave (2). The Apply for leave dialog opens.

- 1Dates
- 2Reason
- 3Submit request
- 4Reset
Step 3: Pick your dates
Click the box under Dates (1). Pick the first and last day on the calendar, then click Apply. The box shows the dates, and the number of days shows below.
Step 4: Write a reason
Type a short reason in Reason (2). You can't send a request without one.
Step 5: Send the request
Click Submit request (3). The request appears in My requests as Pending. Reset (4) clears the form instead.
Days counts every calendar day from the first date to the last, weekends included. The whole request counts in the month it starts in.
Approve or reject a request
Step 1: Open Requests
Admins and leave managers click the Requests tab (1).
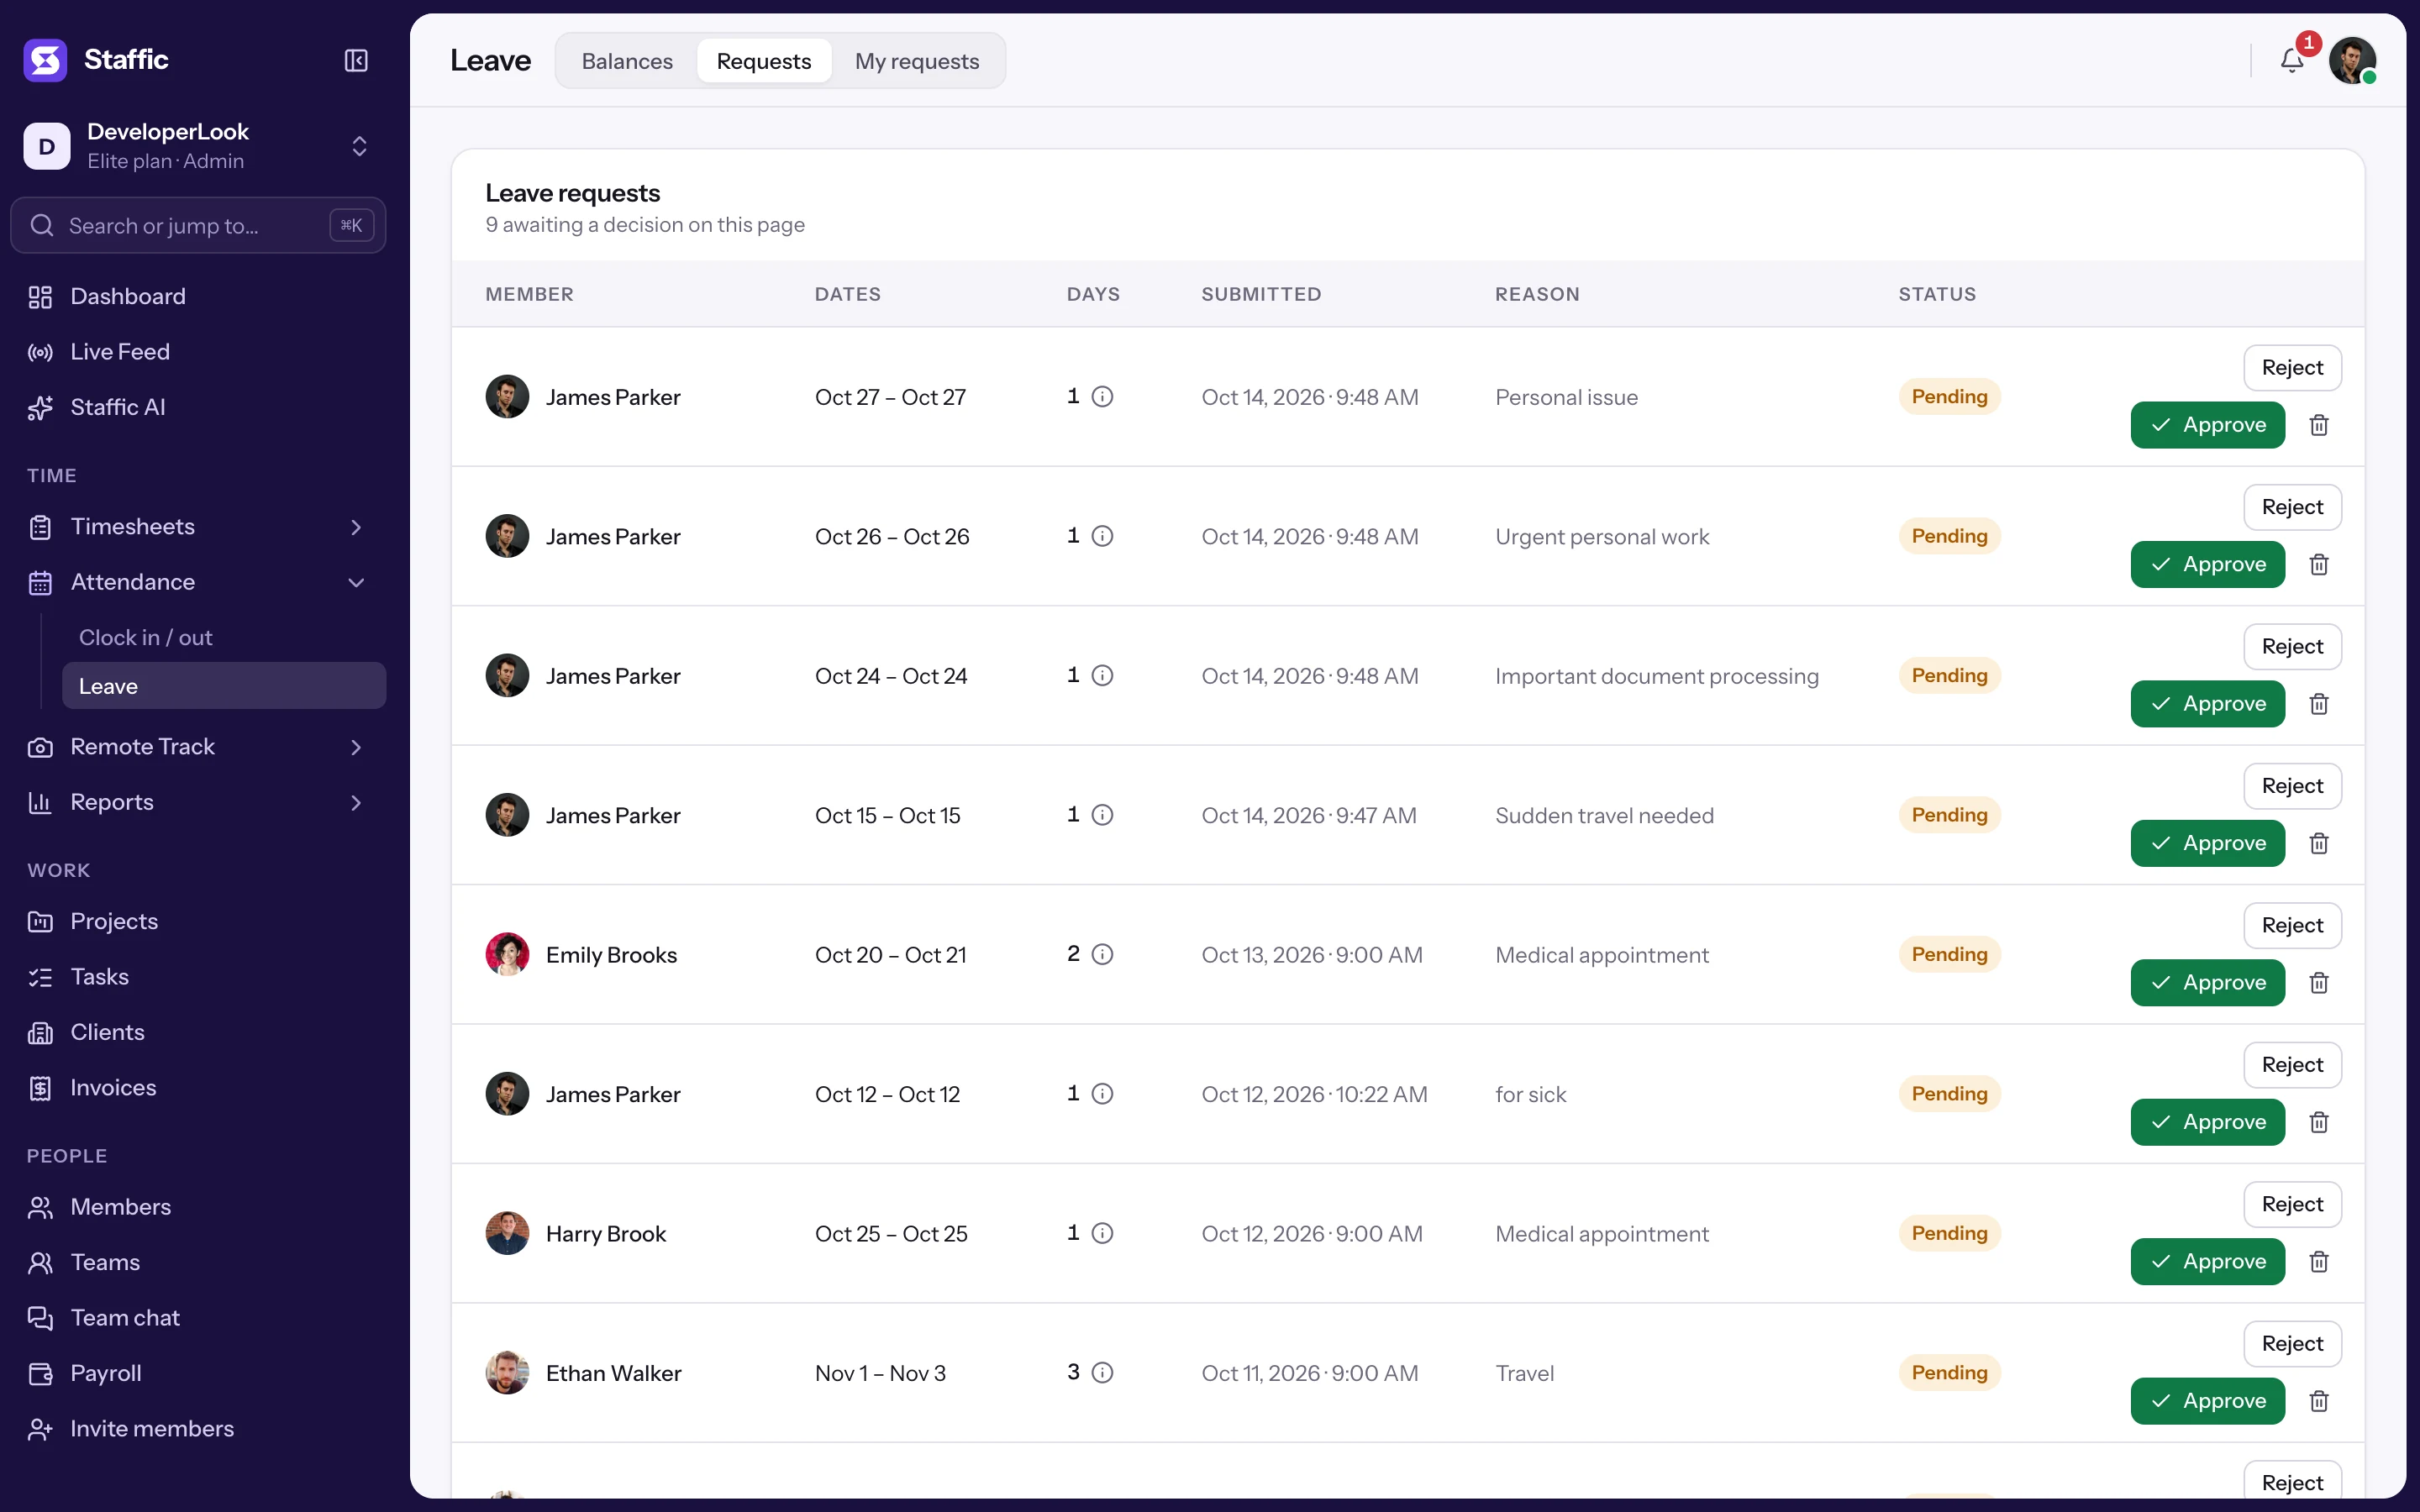
- 1Requests
- 2Member, Dates, Days, Submitted, Reason and Status
- 3Approve, Reject and Delete
Step 2: Check the request
Each row shows (2):
- Member
- Who asked for leave.
- Dates
- The first and last day of the leave.
- Days
- The number of days. Hover the info icon to see each date.
- Submitted
- When the request was sent.
- Reason
- The member's reason. Hover it to read a long one in full.
- Status
- Pending, Approved or Rejected.
- Actions (3)
- Reject, Approve and Delete (bin).
Step 3: Approve or reject
Click Approve or Reject (3). These buttons show only on Pending requests. The member gets a notification either way.
Check Available on the Balances tab first. Staffic approves a request even when it's longer than the balance, and the balance then stops at 0.
Delete a request
On the Requests tab, click the bin icon, then Delete in the dialog. Admins and leave managers can delete any request.
- Pending or rejected request
- Deleting removes it. The dialog warns that this can't be undone.
- Approved request
- Deleting gives its days back to the member's balance. The dialog shows how many days.
Members can't cancel a request themselves. My requests has no delete button, so ask an admin or leave manager to delete it.
How balances change
- Approve
- The request's days come off Available, which never goes below 0. The days are added to the month the request starts in.
- Reject
- The balance doesn't change.
- Delete an approved request
- The days that came off Available go back, and come off the month.
- Edit leaves
- Sets Available to the number of days you enter, half days included.
Step 1: Open the member's profile
Go to Members under People and click the member's name. The Leave section shows Available days and days Taken this year (1), a Monthly breakdown (2) and Edit leaves (3).
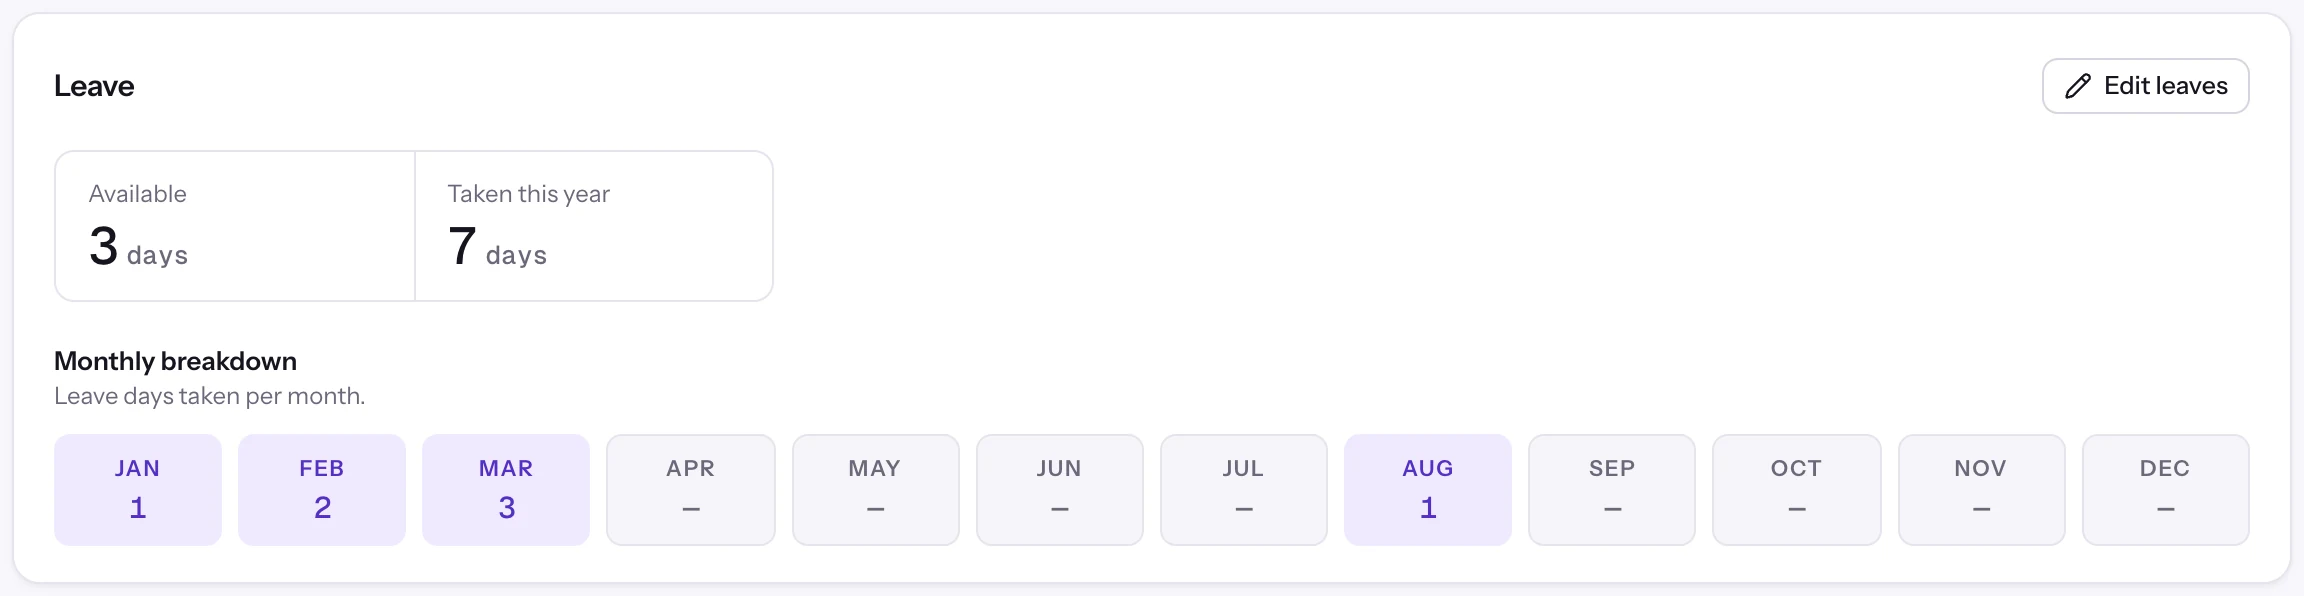
- 1Available and Taken this year
- 2Monthly breakdown
- 3Edit leaves
Step 2: Edit the balance
Click Edit leaves, enter the new number in Available leave days (1) and click Save changes (2).
Only admins and roles with the Leave Management or Members module see Edit leaves.
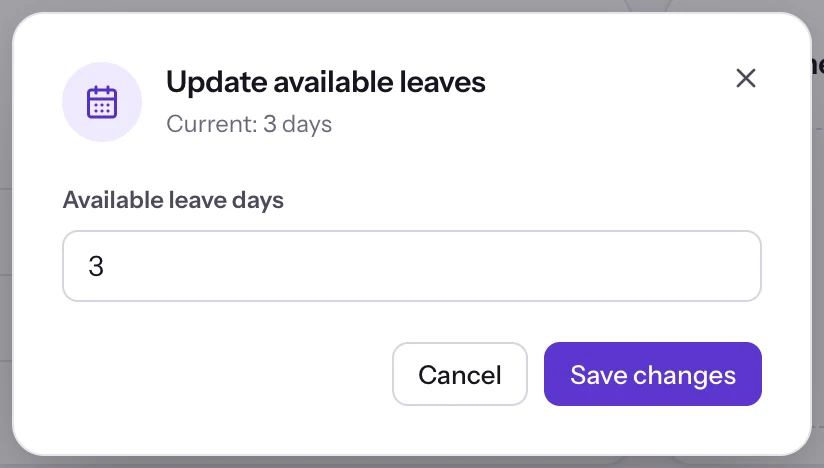
- 1Available leave days
- 2Save changes
Rules and limits
- One balance
- Each member has one leave balance. Requests have no leave type, so ask members to name the kind of leave in the reason.
- Whole days
- Requests count whole calendar days. Edit leaves accepts half days, such as 10.5.
- Attendance and pay
- Approved leave doesn't appear on Clock in / out or timesheets, and payroll doesn't read it.
- Export
- The Leave page has no export.
Common questions
How do I apply for leave in Staffic?
Open Time > Attendance > Leave and click My requests, then Apply for leave. Pick a date range, add a reason and click Submit request.
Do weekends count as leave days?
Yes. Days counts every calendar day from the first to the last date you pick, weekends included.
Can I take half a day of leave?
Requests count whole days. An admin can adjust your balance by half a day with Edit leaves on your profile.
How do I cancel a leave request?
My requests has no cancel button. Ask an admin or leave manager to delete the request. If it was approved, deleting it gives the days back.
Who can approve leave in Staffic?
Admins, and members whose Access control role includes the Leave Management or Members module. They approve or reject on the Requests tab.
Does approved leave change Clock in / out or payroll?
No. Approved leave changes the leave balance only. Clock in / out, timesheets and payroll don't read it.
Tips
- Set Global leave before anyone opens Leave.
- Check Available on the Balances tab before you approve a request.
- Ask members to name the kind of leave, such as sick or annual, in the reason.